


Google announced a new range of Nest Cameras earlier this month, adding battery powered and wired devices, fleshing out their offerings to cover more of the market, including those in rentals or those who just prefer a battery powered camera, or doorbell.
While Google has announced cameras before, the Australian market has always seemed to be left out at least when it came to their Doorbell. That’s now changed with the announcement of the Nest Doorbell (battery), which is launching today on the Google Store for $329.
I’ve been heavily immersed in the Ring ecosystem after importing their original video doorbell from the US. I’ve always found the doorbell to be the tentpole around which a video security system can be built. Now with a Nest Doorbell available, for the first time I’m jumping into the Nest family of devices to see what Google has to offer.
Of course there’s more coming, including today with the launch of the Nest Cam (battery), which you can read my review on here, and later this year we’ll see the new wired Nest options which include an indoor camera, and a Floodlight Cam.

For now though, the new Nest Doorbell has been front and centre of my home and here’s how it went.
Hardware and installation
The first thing you’ll notice about the Nest Doorbell is that it’s larger than the pictures would have you believe. It’s a simple, clean design with what is clearly a camera at the top and a large, easy to hit doorbell button at the bottom.
We only get the ‘White’ colour option here in Australia, but overseas Google is offering linen, ivy, or ash coloured options. White generally goes with most things, but with a semi-permanent fixture on the front of my home, I’d love a choice of colours. Still, the white does look good.
The camera lens includes an LED notification light below. The light is used when charging (Flashing and Solid White when charged), as well as when it’s in operation letting you know when the camera is watching (Solid Green) or someone is watching live (Flashing Green)
Installation is fairly easy, with the instructions contained in an informational video you can find a link to on the instruction card included in the box – g.co/nest/installdoorbell.
The basics of setup start with you charging your Nest Doorbell, which uses a USB-C port on the rear. It takes about 5 hours to charge, with the LED light on the front pulsing white while charging, switching to solid white when it’s completely charged.

Google says the battery will last up to 3 months depending on how much traffic is in the field of view. You can set up Activity Zones to help reduce the amount of events the camera responds to in the settings, as well as select between More Battery Life, More recording or Default which balances between the two in settings. I’ve used the Nest Doorbell quite heavily and it’s still happily at 96%.

The battery power is also important with Google doing a lot of the processing for alerts – Packages, People, Animals and vehicles on-device. This means less reliance on the cloud, though you still need a connection for Familliar Face detection.
The box includes almost everything you need, screws, plugs for masonry/brick and a mounting plate, as well as an angled stop. You even have a wired adapter so you can continually charge the onboard battery if you want to replace an existing wired doorbell.
You do need to supply your own drill bit to mount the doorbell, something that Ring supplies with their Doorbell making it easy to install even on Brickwork. For reference you’ll need a 6mm drillbit for masonry if you’re going into brick like I did.
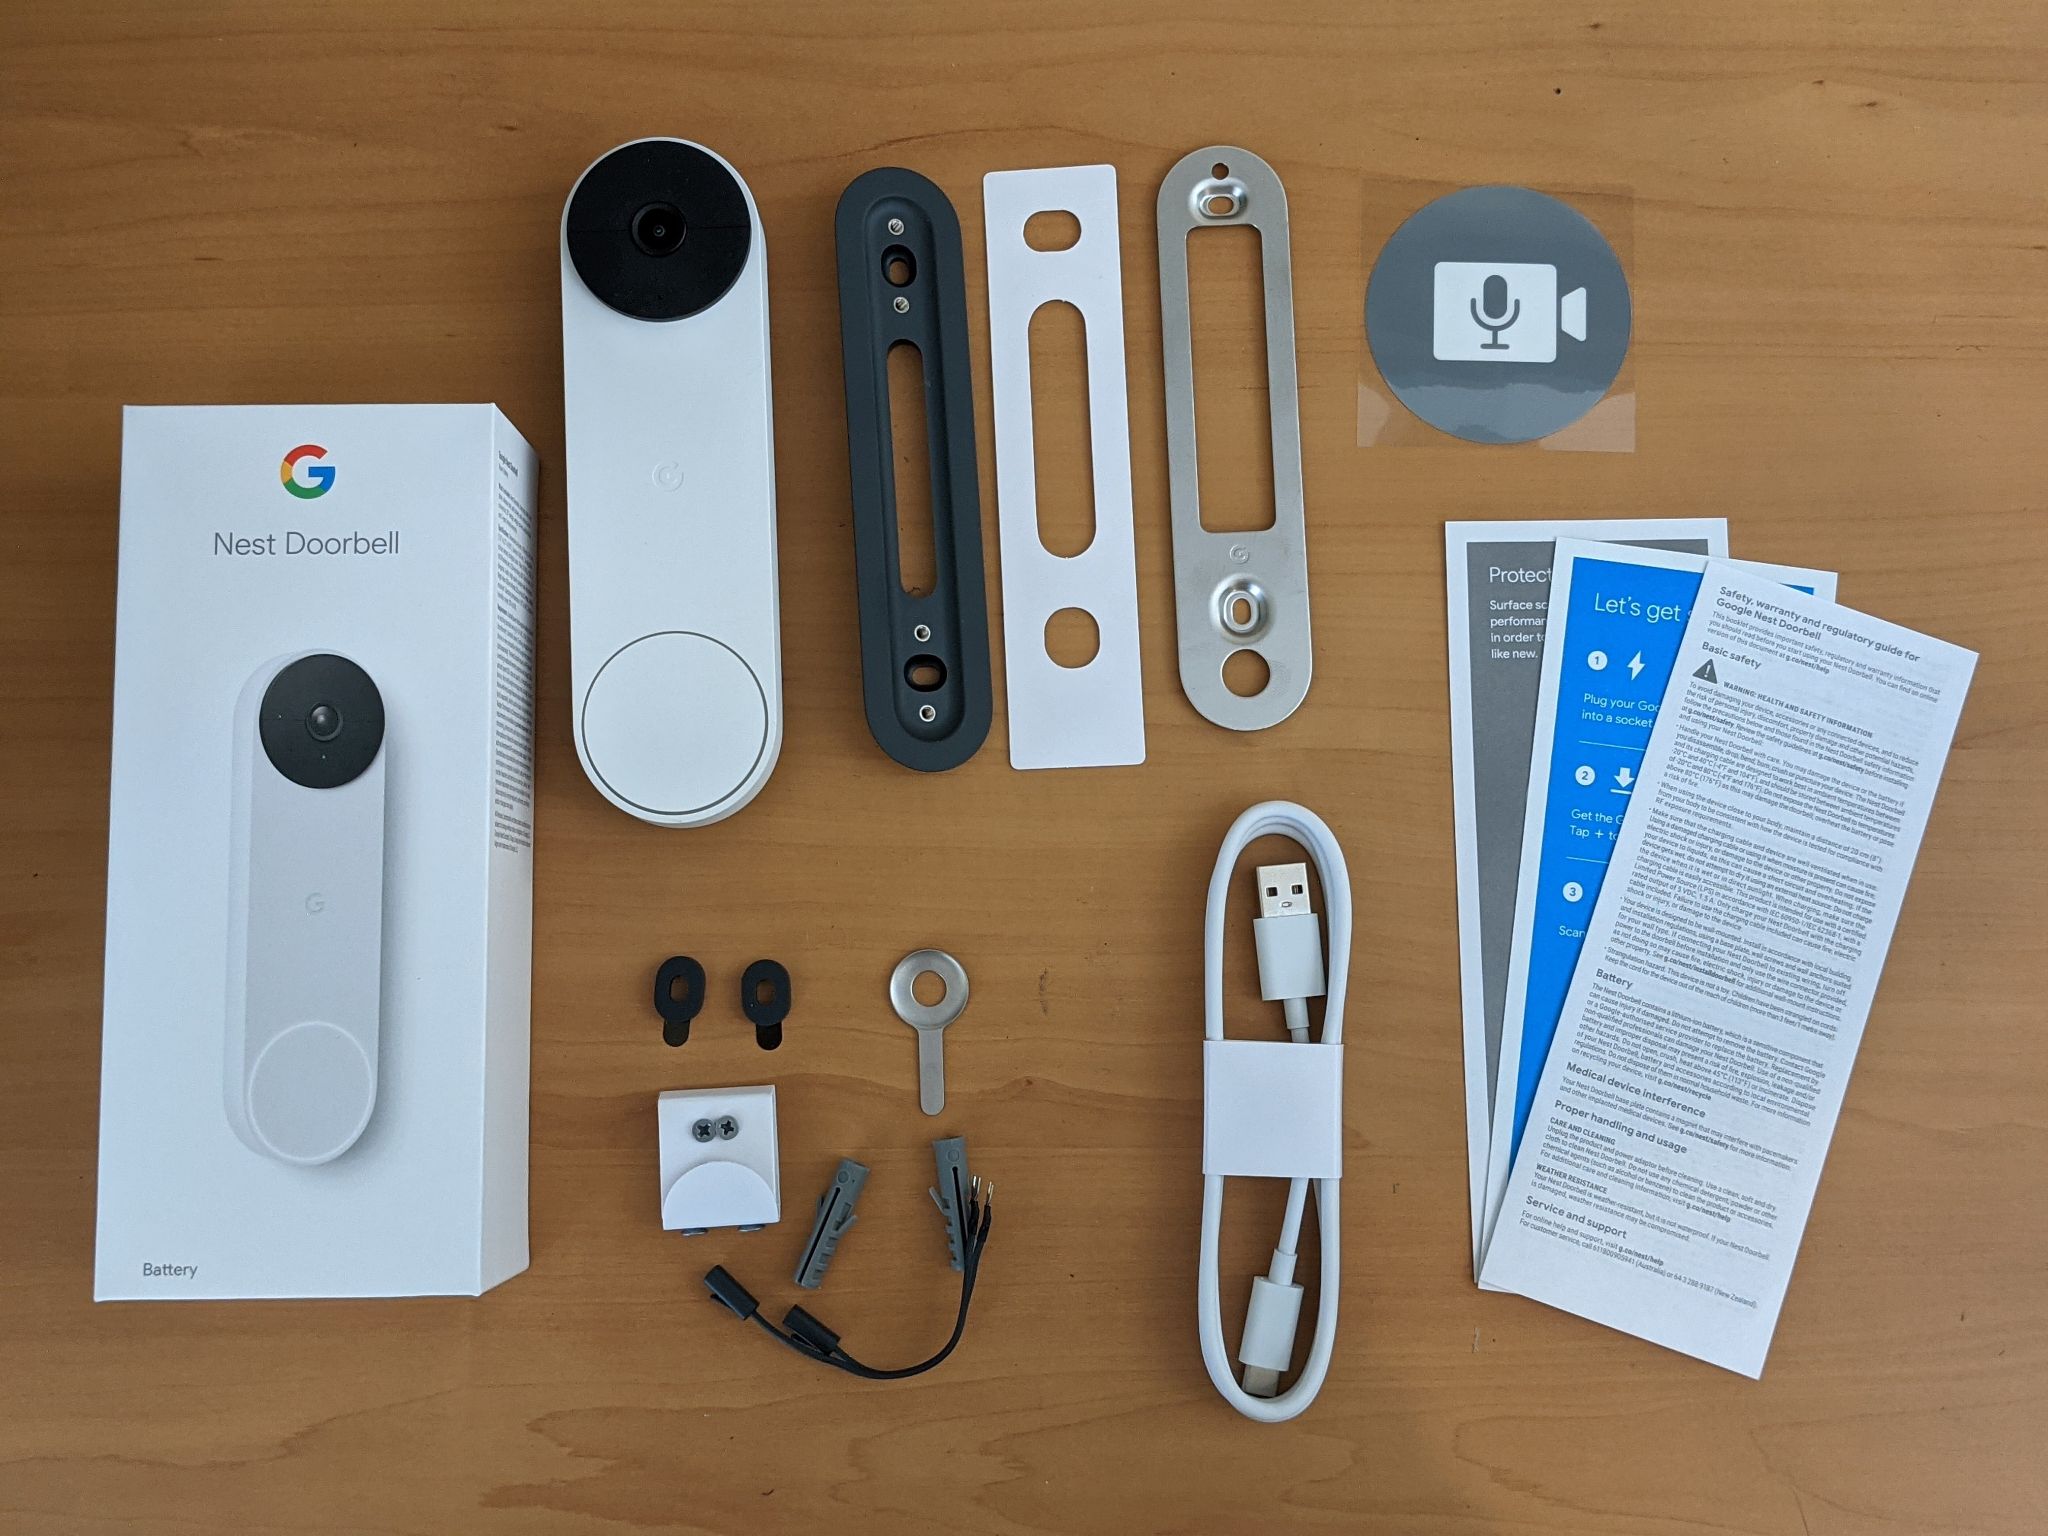
The actual installation process is fairly simple once you watch the install video, which gives you all you need to know about placement – about 1.2m above the ground – and proceed to screwing the mounting plate onto the wall. I used one of the supplied rubber spacers as my brickwork jutted out slightly but with the rubber spacer it sits nicely flush.
You do have to leave a couple of inches above the doorbell so you can slide the supplied tool into the top, which lets you release the doorbell from the mount for charging. One note on this is you can use a flat blade screwdriver to release it, which isn’t ideal from a security perspective, with other manufacturers like Ring at least using torx screws to add another layer to removing it from the wall.

Putting it on is simple, with a guide hole at the bottom which you use to guide the doorbell home, with it clipping on with a satisfying click.
The 1.2m height is about a foot shorter than where my previous doorbell was mounted. This is because of the aspect ratio of the Nest Doorbell video feed. Instead of a wide-view on the doorbell feed, you get a taller 3:4 aspect ratio (HD resolution 960 x 1280 pixels, up to 30 FPS) which lets the camera keep people standing in front of the Doorbell in frame, while at the same time giving you the ability to see packages left on your doorstep.
Overall, the hardware is fairly easy to setup when you have the drillbit ready to go.
Setup and Using it
Previously Google had a dedicated Nest app for viewing your cameras, but since the launch of their Nest Hub Max smart display with inbuilt camera, they’ve been migrating users to the Google Home app to set them up and use them.
To install Nest devices in the Google Home app it’s as simple as hitting the ‘+’ button in the top left corner of the app and following the bouncing ball. You do the setup as part of the hardware installation, so basically charge the doorbell up and then just follow the instructions.
Google makes it as easy as possible to install the Nest Doorbell. The app asks you to scan the QR code on the rear of the device, which gives the app all the info it needs to find it and then configure it on your network.

The Doorbell only supports 2.4GHz Wifi which can be troublesome for some smart home device setup, but Google manages this connection and configuration really well. There’s a firmware update waiting for install during setup, but after that you’re good to go.
Google goes out of their way to explain privacy and security features throughout setup and in the settings. I was also pleased to see that the majority of features require you to opt-in to use them so you’re not inadvertently impacting your privacy without a choice.
During setup you choose some options on video and audio recording, which includes opting in for face detection. Face detection, or ‘Familiar Face’ as Google calls it is a bloody great feature, if you trust Google’s algorithms and privacy – but you should be aware that you only get this feature with a Nest Aware subscription, though you get a free 30-day trial to check out all the premium features.
Nest Aware
Using the Nest Doorbell is pretty simple. You set it up, opt in for things like Face Detection if you want to, but ultimately it all begins when someone presses the doorbell. You may also want access to recordings beyond the 3-hour event window including with the device, at this point it’s time to check out Nest Aware.
Nest Aware comes with two options above and beyond the standard featureset offeirng 30-Day storage for $8.99/month or $89.99 per year with Nest Aware, or you can jump up to $18/month or $180 per year for Nest Aware Plus which includes 60-days Event Video History with 10 days of 24/7 video history

The functionality out of the box is pretty decent though if you don’t want to get Nest Aware. You can stream live video to your phone, or Google Assistant smart display, all of which notify you when that doorbell is pressed. Let me tell you, with a Nest speaker or display in every room of my house, there’s no way you can miss that notification.
There are some functions included by default with the Nest Doorbell.
- Package Detection – the camera can tell when someone with a package is coming to your door,
- Motion/person in Activity Zone – letting you know if someone hits an activity zone, which you can define in the app.
- Up to 3 hours of Event Video History – the Nest Doorbell can record and store up to 3 hours of video events, which can be handy in the event of a power outage, uploading to the cloud when available.
- Animal and Vehicle Seen Alerts – letting you know when your pets walk into frame, or even just a vehicle. You can also use the intelligence of Google to NOT notify you when fluffy enters the frame, or a car drives past.
Any other features, including storing video for future reference and Familiar Face require a Nest Aware subscription.
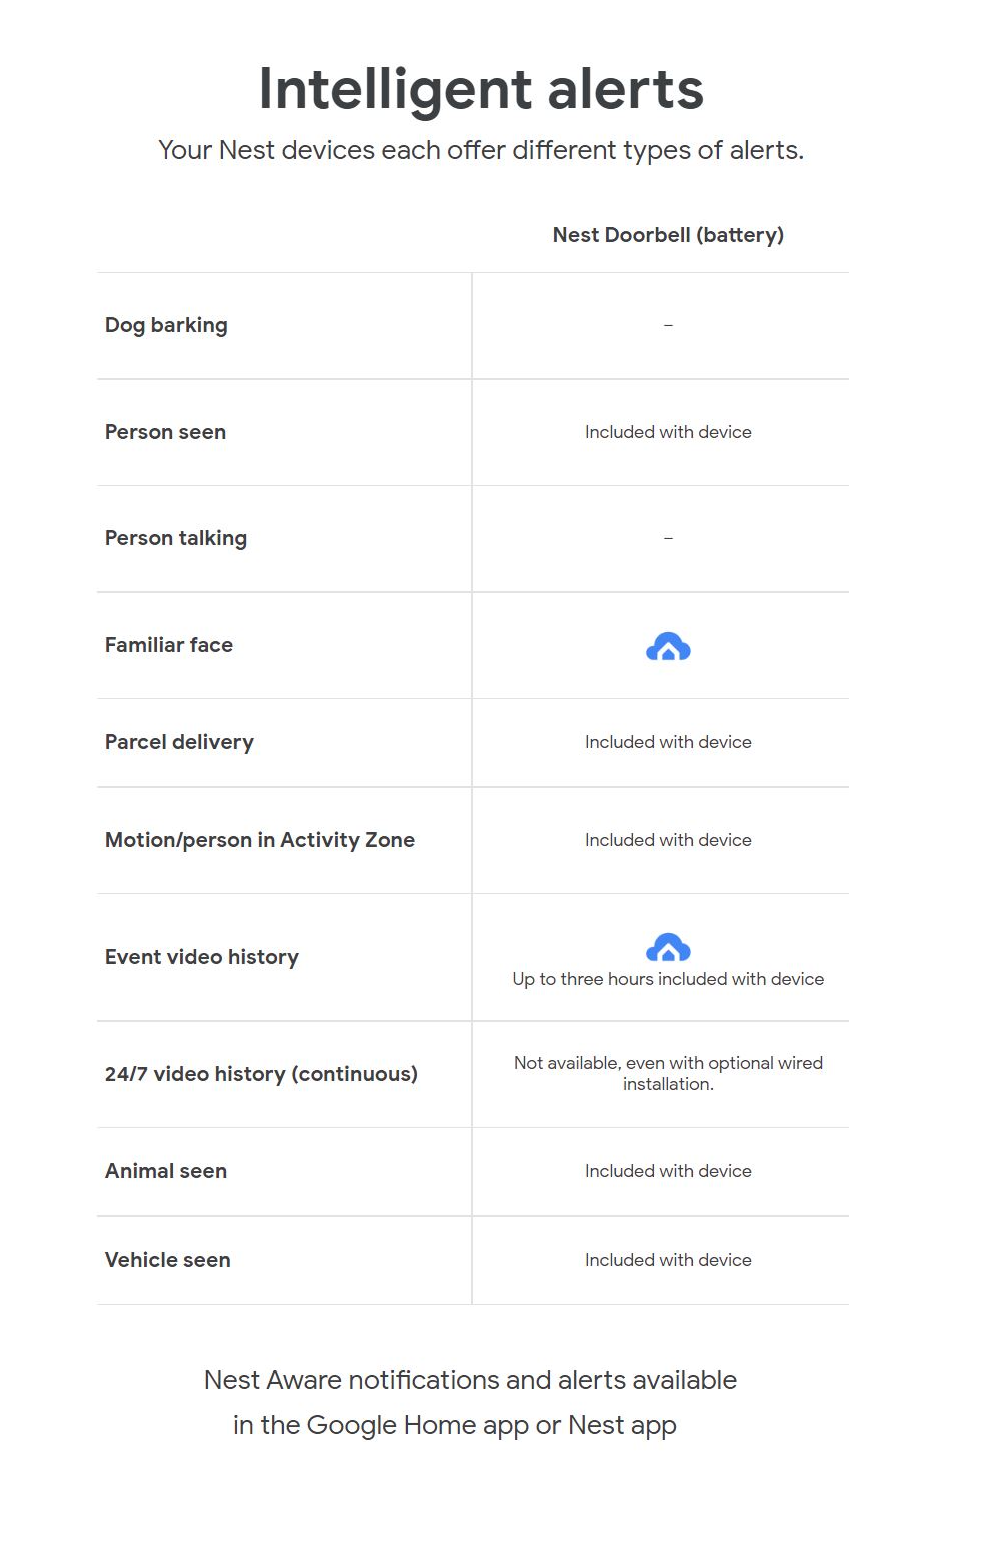
It’s pertinent to note that the Nest Doorbell can’t offer 24×7 continuous video history which can be found on other cameras in the Nest range. But you can take advantage of other features.
Interaction
Viewing the Nest Doorbell feed is easy. You can access your cameras whether you’re at home connected to WiFi or out and about on a mobile connection. You can find all your Nest Cameras under ‘Cameras’ in the Google Home app, and just select ‘Live View’ or you can wait for a notification.
You get a notification on your phone that the doorbell has rung – which will name the person at the door if it recognises them. Just tap the notification, then either hit the microphone icon to talk with the person in real-time (tap it again to mute), or choose from the automated responses.
Notifications do come from any Nest speaker you have in the house, including Assistant powered Smart Displays. It’s the Smart Display notifications I really like, with the Nest Hub Max in the kitchen, or Nest Hub beside the bed switching to a live view of the camera as soon as the notification appears.


Just like in the app you can see, and talk to whoever is there, including giving you the option to just use the preset replies. It’s just a neat way to use it.
Conversations through the Nest Doorbell are quite easy and your voice comes through the speakers clearly, and at a decent volume. So too do the quick responses, with Google reading them out in her dulcet tones.
There is a delay of up to 10 seconds while the app on your phone, or the smart display connects to the Nest Doorbell, but it’s about average for the response from my Ring Doorbell previously.
There is one rider to this which is ‘Quiet Time’, an option you can use to set the Doorbell to do not disturb. It’s a handy option for when you have a meeting, or simply cannot be disturbed and during this time the doorbell simply won’t ring.
Let’s go to the tape
I’m a big fan of going back through my videos, and the Nest Aware subscription gives me a slightly longer window to do so.
Firstly, you can sort through the history of your saved videos by using the filters. From the ‘Full History’ option available in the menu you can then hit the filter button at the top which gives you a good array of options including sorting by what the camera has seen – Familiar Faces, Package detection and more, or events heard by the camera including dogs or glass breaking, people talking and more. It’s a great way to be able to quickly find an event.
You can also export videos as required by tapping on ‘Event Details’ and then hitting the download button that appears. It’s not exactly intuitive to have to go into Event Details to get the download button, but it’s there if you need it.

Should you buy it?
Google has a good array of smart home devices available in Australia, the Nest Doorbell (battery) now gives you another reason to look at a completely Nest ecosystem at home.
I was pleasantly surprised by the Nest Doorbell and how easy it was to install and integrate into an existing Google Home environment. Even for new users the setup process is very straightforward, with the onboarding experience simple, and easy to follow.
There’s obviously a big stigma with Google and privacy, but at each step along the way you’re informed about when things are being used by Google and are given the option to opt in, rather than having to opt out – and this is good. Google are very aware of their reputation and have done this very well.
The big choice of course is looking at the competition. The main competitors in this category are Ring and Arlo with their hardware and cloud storage options. Google has priced the Nest Doorbell at the same price as the Ring Doorbell 4, though it’s a decent price hike from Arlo’s wired and wire-free options.
What I feel is the secret sauce of Google’s Nest Doorbell is in the features like Package Detection and Familiar Faces. These are brilliant, letting you know when a package or someone you know has arrived. It’s this sort of convenience that I want in a doorbell.
As a way into the ecosystem, the Nest Doorbell is a great place to start adding video security to your home, and at $329 it’s very much worth checking it out.
Daniel has been talking about, learning about and using tech since he was able to toggle switches and push buttons. If it flashes, turns on or off or connects he wants to use it, talk about it and learn more about it. Like this article? Buy me a coffee!


